Cover multiple page walkthrough with just one product tour

Our Digital Adoption Platform simplifies complex product flows with the step-by-step walkthroughs and smart tips. This article provides tips and tricks on how to deliver structured learning paths with Usetiful, especially when you need to:

  • cover multiple pages within just one product tour to keep your users focused
  • reduce the number of tours to keep the content management simple

One product tour rules them all

Usetiful allows you to cover multiple pages with just one product tour. All you need is to set up the tour and its steps correctly.

Example:

Let's say we want the tour to cover Home (index.php) and Form (form.php) pages of our demo application. 
Welcome page
Form page
Firstly, we need to define the Page Targeting to ensure that the tour appears on these 2 pages only. We enter the tour settings and set up the condition "URL contains" with the value "index.php|form.php". This way the tour appears only on pages that have "index.php" or "form.php" as part of their URL.


We want the tour to autoplay once users reach the first page, so we enable the "Autoplay" option. Also we want to remember user's progress with the tour, so the feature "Remember the last step" is also enabled.


Now we can continue to build the content of the tour. Our demo scenario is that the user is introduced to features on the Home page first (index.php is the landing page that the user needs to visit before reaching other parts of the application). Then the user navigates to the Form page (form.php) where the tour should automatically continue.


The steps before "redirect" will be available on the Home page and steps after the "Redirect to Form.php" will display once the user reaches the Form page. Let's have a look at how the redirect is configured:


The redirect step contains the address of the Form page in the field "Next page address". It is also defined that the current tour continues on the target location

Users can be redirected either automatically, when the previous step ("Step 3") is completed, or you can let a user navigate to the next page manually. In that case, you need to make clear to users what they need to do in order to continue the tour.

Let's update the content of "Step 3" to point to the "Add media" button with instructions. Click on the button will redirect users to the Form page.

In the step details, set up the field "Progress on click of" value to Element, so the next step (automatic redirect) is activated when users click on a given element (".btn-primary" in this case). 


When users reach the Form page, the tour automatically continues with the "Step 5".

What if I need to support multiple tours on just one page?

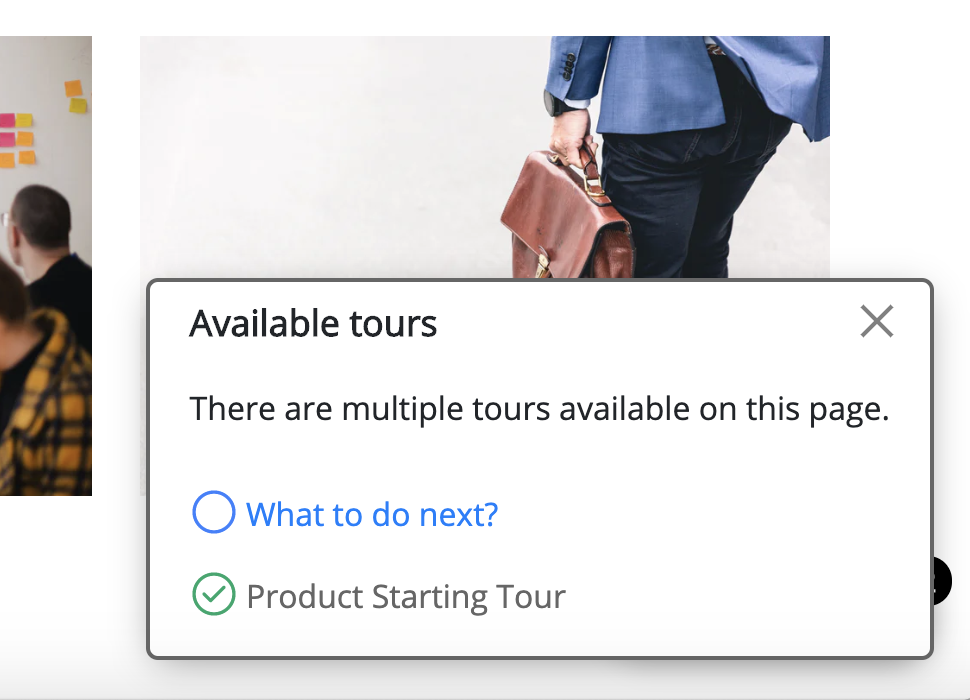
You can target several product tours on the same page. If it isn't specified which product tour takes precedence from another we display a menu that lets users choose from all available tours on a given page.
A button that activates the selection of tours.

List of available tours.

If you encounter any issues or need different options, feel free to contact us.

Don't have Usetiful account yet? Start free today!

Popular posts from this blog

Salesforce In-App Guidance: What You Need to Know

  Salesforce is a cloud-based customer relationship management (CRM) tool. It's packed with features and functions that allow businesses to handle customer success and product management, predict sales revenues, nurture leads, and increase productivity.  However, all these varied and excellent applications come at a cost. One commonly-cited issue with Salesforce is its steep learning curve. A difficult-to-learn app can be a real issue when you need to train new users. The CRM software giant recognized this some time ago. As a result, they released a tool called In-App Guidance as part of their Lightning Experience upgrade.  The idea behind In-App Guidance is that it helps train and onboard new users with on-screen prompts and interactive walkthroughs.  Let's explore more. Image by drobotdean on Freepik What is Salesforce In-App Guidance? Salesforce has been around for a long time. It's well-established as the most popular sales and CRM tool. A few years ago, they int...

How DAP Can Help Your Sales and Marketing Teams

  These are trying times for the overall business community. The rise in interest rates has slowed economic activity, with subsequent budget cuts targeting sales and marketing departments in particular.  You've probably already heard how digital adoption platforms (DAPs) like Usetiful can boost sales and marketing for your product. But what about using the software to help your sales and marketing employees?  In this article, we'll show how you can use a digital adoption solution like Usetiful to drive better outcomes for not just your product and your users but also your employees. Image by our-team on Freepik Sales reps and time to productivity (TTP) If you're familiar with digital adoption tools like Usetiful, you'll already understand concepts like time to value (TTV). In short, it's a metric that measures how long it takes a user to get value from your product. Another way you can look at this is how long it takes someone to engage with your product and gain a ...

Select Element on Your Page

  To associate tour steps (pointers) with specific elements on your site, you need to hook to the selectors of elements. Selectors are used to "find" the HTML elements on your site. It is not difficult to find out the selector of a specific page element. The easiest way is to use our Chrome extension . Usetiful for Chrome extension (Recommended) 1. We recommend you to first install  the extension  - it enables you to preview product tours directly on your page without embedding the code. When on the page, it allows you to get the element selector on just one click.   2. Inside the tour editor, the " Element"  field require you to enter the selector of the HTML element on your site. Click on the  "Select element"  action on the right side of the field.  The following dialog will appear if the Usetiful browser extension is enabled. 3. Enter the address of your web page and click "Open page" 4. To select the...